Introduction
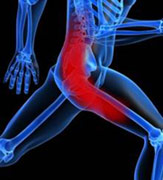
Sciatica is not a disease in itself but a symptom of the sciatic nerve being irritated or compressed ('pinched' as one may call it in a layman�s language) along its course. The most common place for this to occur is the lower part of the spine where the nerve roots of the sciatic nerve are compressed by a prolapsed (slipped) disc. Pinching of the nerve due to a Disc prolapse is the most common cause. Other medical conditions including trauma to the spine, spinal tumors, and spondylolisthesis (slipping of one vertebra over the other) and lumbar vertebral canal stenosis can cause sciatica.Yoga practice can enrich your life in many ways; keeping a supple spine, limber hamstrings and an open pelvis are part of any program to relieve the compression and tension of sciatica. Relax, listen to your body, and enjoy relief from your sciatic pain.
Yoga and Sciatica Pain
Sciatica is a painful condition characterized by symptoms ranging from sharp pain through the lower spine, a stabbing sensation in the buttock, to knee or ankle pain, or even numbness or burning in the leg. Sciatic pain is common in individuals with lower back problems, the obese, pregnant women, and the elderly. Yoga can, however, provide relief from this condition which causes temporary but acute pain in nearly every adult at some point in their lives; sciatica can however cause debilitating pain if left untreated. Yoga for sciatica is more of a rehabilitation option than an actual treatment. Yoga is a form of mind/body exercise which is wonderful and fulfilling to the anatomy and the spiritual self. Yoga is typically recommended as a form of therapeutic exercise for sciatica, but experience has taught us that physical activity is merely symptomatic treatment for most painful conditions. Exercise increases cellular oxygenation, temporarily fighting off the effects of ischemia on sensitive nerve and muscle tissues. A combination of yoga asanas and meditation can provide partial to complete relief of sciatic pain. Deep yogic breathing helps to relax the tight muscles and reduce inflammation. On an psychological level we subconsciously tense up in anticipation of pain, deep breathing reminds us to stop and be in the moment, sending healing prana to the parts of our body that are in distress.YOGA POSES FOR SCIATICA PAIN
Mountain Yoga Pose
Mountain pose is used at the beginning and in the middle and in the end, in which you pay attention to your position, your concentration and your breathing. During intensive Yoga sessions this pose makes it easier for you to maintain your meditative focus, as well as to increase and regain it.Bridge Pose
The Bridge Pose is also known as Setu Bandhasana which means construction of a bridge. It came from the words "setu" meaning bridge, "bandha" meaning lock, and "asana" meaning posture. Setu Bandhasana is effective in promoting relaxation and reducing stress. It helps to promote a healthy flexible spine while strengthening the legs and buttock muscles.Tree Pose
The tree pose is a balance pose incorporating three lines of energy, emitting from the centre outwards. The Tree Pose helps strengthen your thighs, calves, ankles and back. It can also increase the flexibility of your hips and groin.Triangle Pose
The Sanskrit word tri means three and kona means corner or angle. Thus "three corner or three angle posture" is often called the triangle posture. This posture is also known as the utthita trikona-asana. Utthita means stretched or extended thus this is the Extended Triangle Pose.Warrior Pose I
The Warrior Pose I or Virabhadrasana I improve balance and agility and strengthen your legs, back, and arms. It also targets the chest, shoulders, neck, and abdominal area.Warrior Pose II
The Warrior II pose is a popular standing yoga posture used in many forms of yoga, including hatha, ashtanga, Iyengar, and Bikram.This is a dynamic standing posture like Trikonasana, the triangle pose. It requires stamina, demands a lot of effort, and is a powerful pose with many benefits. Alignment is called for in Virabhadrasana II. Strong legs provide grounding of the pose, with lifting from the hips upwards.Half Moon Pose
The standing half moon pose in yoga is a great posture to use for improving balance and lengthening the spine. In Half Moon, you begin to open up the whole skeletal system, including the spine, the neck, the ribs and the scapulae. Half Moon Pose strengthens every muscle in the body's core, especially in the abdomen, and flexes and strengthens the latissimus dorsi, oblique, deltoid and trapezius muscles. It increases the flexibility of the spine comprehensively, from coccyx to neck; promotes proper kidney function; and helps to cure enlargement of the liver and spleen. Half Moon also firms and trims the waistline, hips, abdomen, buttocks and thighs.Locust Pose
This pose is named as such as it resembles the shape of the insect known as the Locust. This pose helps to strengthen, stretch and reduce stiffness in the lower back while bringing flexibility to the upper back region.Child Pose
The Child Pose is a relaxation pose which is used to normalize the circulation after the Head Stand and to give a counter stretch to the spine after the backward bends. It is a resting pose that can be done to precede or follow any pose. Performing the Child Pose stretches the hips, thighs and ankles gently. It also helps relieve stress and fatigue, and calms the brain.YOGA ASANAS FOR SCIATICA PAIN
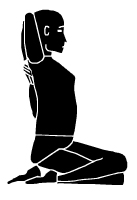
GOMUKHASANA
Steps
- Inhaling slowly through the nostrils bring right hand to the back. Bend it at the right elbow and then raise the back of the palm up towards the neck. In this process the back of the palm is pressed against the spine. The fingers of the right hand face upwards.
- Now raise left hand upwards bending at the elbow and put the left palm on the left shoulder. Then, first try to touch the fingers of the left hand with the right hand. If there is any difficulty in touching the fingers to some individuals, they should try as much as possible and then stay there.
- Try to raise the elbow of the left hand straight upwards (with the lock). Breathe normally. This is a Gomukh Asana.
- Retain this locked position for about 30 sec. You can either hold the posture while the breath is held or you can try holding the posture while breathing gently through the nostrils. If you choose to breath, then hold the posture for thirty seconds to a minute.
- While releasing the posture, loosen the grip on the fingers and then unlock the fingers gradually. Then slowly bring both the hands on the thighs and rest.
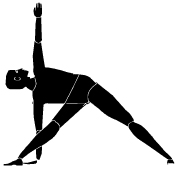
UTTHITAPARSVAKONASANA
Steps
- Stand in Tadasana (mountain poses) against a wall, with your heels and your buttocks touching it. Place the block on the floor behind your right foot. Inhale, and spread your feet 1 m (3.5 ft) apart. Turn your right foot out to the right, until it is parallel to the wall.
- Turn your left foot in slightly to the right. Press the outer edge of your left foot firmly on the floor, and bend the right knee, pushing your thigh down until your calf is at right angles to the floor. Stretch your left arm away from your left shoulder.
- Bend to the right, and place your right palm on the block. Stretch the left arm up, with the palm facing forward. Now rotate the arm and bring it toward your left ear. Your left thumb should touch the wall. Turn your head and look at your left arm. Maintain a continuous stretch from the left ankle to the left wrist. Press your outer left foot into the floor. Move your shoulder blades into your body, and extended your spine toward your head. Hold the pose for 30 seconds.
- Repeat the pose on the other side.
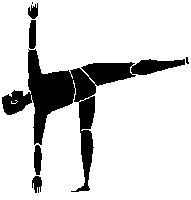
ARDHACHANDRASANA
Steps
- Perform Trikonasana to the right side, with your left hand resting on the left hip. Inhale, bend your right knee, and slide your left foot about 6 to 12 inches forward along the floor.
- At the same time, reach your right hand forward, beyond the little-toe side of the right foot, at least 12 inches.
- Exhale, press your right hand and right heel firmly into the floor, and straighten your right leg, simultaneously lifting the left leg parallel (or a little above parallel) to the floor.
- Extend actively through the left heel to keep the raised leg strong. Be careful not to lock (and so hyperextend) the standing knee: make sure the kneecap is aligned straight forward and isn�t turned inward.
- Rotate your upper torso to the left, but keep the left hip moving slightly forward.
- Most beginners should keep the left hand on the left hip and the head in a neutral position, gazing forward.
- Bear the body�s weight mostly on the standing leg.
- Press the lower hand lightly to the floor, using it to intelligently regulate your balance.
- Lift the inner ankle of the standing foot strongly upward, as if drawing energy from the floor into the standing groin.
- Press the sacrum and scapulas firmly against the back torso, and lengthen the coccyx toward the raised heel.
- Stay in this position for 30 seconds to 1 minute.
- Then perform the pose to the left for the same length of time.
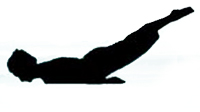
SALAMBHASARVANGASANA
Steps
- Spread a fourfold blanket on the floor. Lie flat on your back with both legs and feet touching each other. Keep your palms facing the floor.
- Exhale and bend knees over the chest. Press hands down on the floor and, with a swing, raise waist and hips.
- Support hips with the hands and lift the trunk.
- Raise hips and thighs further, supporting them with the back of your hands. From the shoulders to the knees, the body should be perpendicular to the floor.
- Straighten legs towards the ceiling.
- Stay in this position for two-three minutes. Gradually increase the duration to about seven-eight minutes.
- Exhale. Bend the knees and gradually slide down buttocks and back. Release hands from the back and extend legs on the floor.
SETUBANDHASANA

Steps
- Exhale, lie flat on your back, bend your knees and place your feet flat close to your buttocks hip width apart. Toes in and heels out, do not splay your feet. Toes and knees should be straight ahead.
- Inhale, lift your hips off the floor coming into a back bend position. Feel the tailbone lifting as if it were gently driving between your knees. To understand this action of the tailbone, while lying on the floor practice a pelvic tilt before coming into pose. As you lift your hips up roll your shoulders under and clasp your hands. Keep your feet flat on the floor, knees in front of hips and open the lungs in the front body by taking your chest to your chin. Do not splay the feet as this will cause compression in the lower back. Hold for 5 -15 breaths.
- Exhale roll down vertebra by vertebra until your back is flat on the floor.
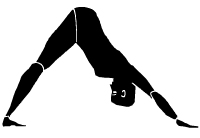
ADHOMUKHASVANASANA
Steps
- Stand in Tadasana facing a wall, about 1 m (3.5 ft) away from it. Place 2 of the blocks on their broad sides, shoulder-width apart, against the wall. Place the third block on its long side, 45 cm (18 in) away from the wall. Separate your feet to a distance of 45cm (18 in). Kneel, and place your palms on the two blocks against the wall.
- Press your palms down on the blocks and walk your feet back, until they are 1.2 m (4 ft) away from your hands. Make sure that your feet are in line with your hands and the same distance apart. Raise both the heels, stretch your legs, and then lower your heels to the floor. Stretch your arms fully.
- Consciously stretch each leg from heel to buttocks, and from the front of the ankle to the top of the thigh. Raise your buttocks, stretch your chest, and push your sternum toward your hands.
- Exhale, and then rest your head on the third block.
- Press your hands down on the blocks, extending your arms fully. Stretch your spine and expand your chest. Keep your throat soft and elongated. Relax your eyes and keep your brain passive.
Diseases Related to Sagitarius |
||

